


How-to: coffee cupping at home for beginners
Figure out what kind of coffee you love from the comfort of your kitchen.
Why cupping matters at home

Cupping is how coffee professionals evaluate aroma, taste, and quality, but you don't need to be an expert to try it. All you need is a kitchen, a few cups, and a few different coffees.
Most people choose their morning coffee based on the color of the bag or a quick guess at the grocery store. Cupping cuts through that guesswork: a single session can tell you more about your preferences than years of casual drinking.
What you need: coffee tasting at home for beginners
You might see cuppers using special silver spoons and ceramic bowls online, but the goal at home is to compare flavors without buying a lot of fancy gear. Here is your no-fuss shopping list for a home tasting:
-
2-3 different coffees: This is the most important part. To notice a real difference, pick coffees that contrast with each other, like one from Ethiopia and one from Sumatra, for example.
-
A kitchen scale: Accuracy matters when you are comparing. You want to make sure you are using the same amount of coffee and water for every cup.
-
A kettle: Any kettle that can boil water will work.
-
Small cups or bowls: Pros use bowls that are a little over 7oz, but regular, smaller mugs are fine, as long as they’re the same size. Avoid insulated travel mugs; you want the coffee to be able to cool down naturally so the flavors can develop.
-
Two spoons: You only need one for slurping, but you’ll need both for preparation.
-
A mug to spit into (optional): You certainly don’t have to spit out your coffee, but, much like wine tasters, coffee professionals almost always do, especially when cupping large amounts of coffee.
-
A notepad or your phone: You'll think you’ll remember all the differences, but you won't. Write them down.
The step-by-step cupping process

Consistency is the key to a successful home tasting. If you treat every cup exactly the same, the only difference you’ll taste is in the coffee itself.
1. Get the dose right
Place a cup on your scale and weigh out your coffee. The amount will depend on the size of your cups. For a 10oz cup, you’ll need around 16.5g, for an 8oz cup, around 13g. Do this for each coffee you are testing. This matches the ratio we use in our quality control process.
2. Grind each coffee at a medium-grind.
You’ll want a grind size similar to what you would use for an auto-drip brewer. If the grind is too fine, the coffee will turn bitter before you get a chance to taste it. You can check Trade’s grind size chart to make sure you’re on the right track. Professionals grind and discard a few extra grams of each coffee before grinding the actual cupping dose, in order clear all of the previous coffee out of the grinder.
3. Smell your ground coffee
Even before brewing, grinding will release some of the volatile aromatics in the coffee. Get your nose in there and see if you can smell the difference.
4. Pour water just off the boil
Start your timer and pour the hot water over the grounds. Fill each cup all the way to the rim. Make sure all the grounds get wet. You should see a crust of coffee grounds floating at the top. If the crust doesn’t form and you’re using fresh coffee, don’t worry too much about it, but you might want to grind a smidge finer next time.
5. Wait four minutes
Set a timer for four minutes. Do not touch, stir, or move the cups. This is when the coffee is doing the heavy lifting of brewing.
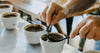
6. Break the crust
After four minutes, take your spoon and gently push the floating grounds to the back of the cup in three consistent motions. While doing so, get your nose right down to the water and inhale. Roasters call this breaking the crust, and it is the moment when the coffee’s aroma is the strongest. Does it smell like blueberries? Peanuts? Burnt caramel? Write down your first impressions.
7. Skim the foam and floating grounds
Once you’ve smelled every cup, use your two spoons to skim off the foam and any floating bits of coffee. It’s easiest to do so while starting with your spoons conjoined at the back of the cup and moving them carefully towards you. Toss those into a waste bowl. Your coffee should now look like a clear, dark liquid.
8. The cooling phase
If you taste the coffee without letting it cool, you will burn your tongue and taste like nothing but heat. Coffee flavor actually gets better and more clear as it drops toward room temperature. Some cuppers dive in as soon as the clock hits 10 minutes from your first pour, some let it get even cooler before starting.
9. Taste the coffee
Dip your spoon into the coffee and slurp it into your mouth, which sprays the coffee across your entire tongue and palate in a way that helps you catch tiny details that a normal sip might miss. It also releases those aromatics through your retronasal cavity and back behind your nose, where the olfactory bulb sends signals back to your brain.
10. Keep tasting
Most cuppers will go back to each coffee several times, noting any changes as it cools.
What to notice

Even if you’re not an experienced taster, To understand what you like, you just need to ask yourself some simple questions:
-
Is it bright or smooth? Does the coffee have a sparkle or a zing like lemon juice? That is acidity. Or does it feel smooth like a chocolate bar?
-
Is it heavy or light? Think about the difference between whole milk and skim milk. Some coffees feel thick and heavy, while others feel tea-like and light.
-
Is it sweet or bitter? Good coffee can taste sweet even without sugar. Look for notes of caramel or honey. But coffee is bitter too, and darker roasted coffees can have a little bit of a bitter bite.
-
Do you recognize any flavors? Don't overthink it. You can start general and then get more specific by asking yourself further questions (“it tastes fruity,” “it tastes like a berry,” “it tastes like a blueberry”) or dive right into whatever specific thing it reminds you of (“it tastes like strawberry/kiwi juice from my childhood lunchbox”). There are no wrong answers.
-
Do I like it? Professional cuppers can calibrate to agree on the quality of a coffee, but it’s also an inherently subjective exercise. Which of the coffees do you prefer? Why?
How to use what you learn

At Trade, we use these methods to evaluate coffees before they earn a place in our selection, and many of our roasters have participated in cupping competitions with a similar process. The goal at home isn’t to become a professional judge; it's to help you better communicate what you like.
If you consistently prefer brighter, fruitier coffee, start with light roasts from East Africa. If heavier, chocolatey roasts won, try medium-dark blends. Our taste quiz can help you dial in on the best coffees for your palate.
Stop settling for okay coffee. Grab a few bags, a couple of spoons, and start cupping.


